
The Arduino micro-controller is a powerful little wonder. We already know it can be programmed using the Arduino IDE, but wouldn’t it be cool if we could interact with it strictly using Flash ? This article shows you how it can be done.
Once everything is set up, what can be achieved by the Flash/Arduino combo is pretty amazing. For instance, you can configure the board, read sensor inputs or trigger external equipments directly from the comfort of your beloved ActionScript 3 code. While this is all fine and dandy, getting there is a little more complicated than the ol’ plug-and-play. Hang on, it might be a bumpy ride.
If you are a Mac OS X user, Kristofer Joseph posted a similar tutorial targeted at Mac OS X.6 on his site. Check out hist post called Arduino and Flash on Snow Leopard.
Update : while the procedure described on this page work fine, a new option is now available for Adobe AIR users. It involves the use of an ANE (Air Native Extension) that talks directly to the serial port freeing you from using a serial-to-tcp bridge. You can learn more about it on the project’s page.
0. The Arduino Board
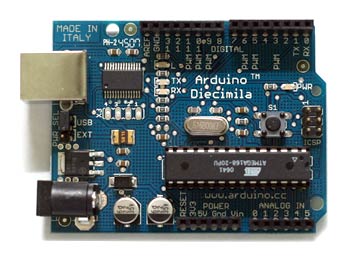
Since you are reading this article, I am assuming you already own an Arduino board. If not, you can buy one online at many electronics and hobbies shops. I bought my Arduino Diecimila (below) at RobotShop.ca. I am told NKC Electronics (link down) is also a good spot for Arduino-related paraphernalia.
1. The Arduino IDE Software
First of all, if you haven’t already done so, get the Arduino IDE software. The Arduino IDE is a Java application that allows you to write and upload code to the board through its USB (or serial) interface.
By the way, the procedures outlined in this article have been tested to work on Windows XP – on a MacBook Pro ;-). If you are using Mac OS X, Linux or some other version of Windows, your mileage may vary.
Once downloaded, unzip the file and put the resulting folder in a convenient location. In theory, you should then be able to double-click the arduino.exe file to launch the IDE. However, this does not always work for me. If you are experiencing a similar problem, you can launch the IDE by double-clicking the run.bat file.
My understanding is that, in some circumstances, the Java environment is not properly registered with the app, thus the need to use the run.bat file to set the path and other system variables.
2. The FTDI USB-to-Serial Drivers
The Arduino IDE expects a serial connection to the Arduino. Therefore if, like me, you are using the USB-enabled version, you have to install the USB-to-Serial driver from FTDI. The driver is included in the Arduino package in the drivers\FTDI USB Drivers folder. Upon plugging-in your Arduino, Windows will prompt you with the New Hardware Found wizard. Simply, direct the wizard to that folder and the installation will take place.
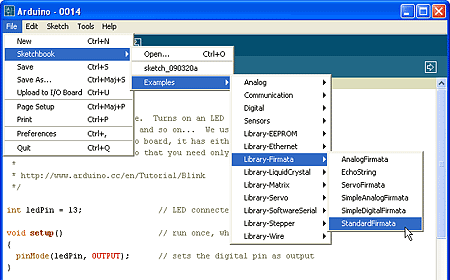
To make sure everything is set up properly, in the Arduino IDE, open the “Blink” sketch from the File menu :
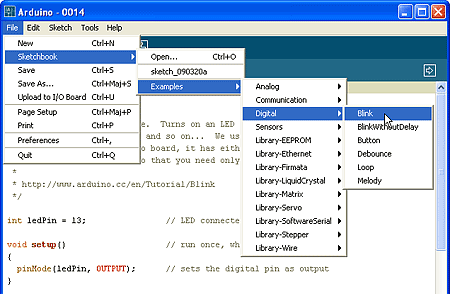
A sketch is simply code that you want the Arduino to run. With the “Blink” sketch open, go to the File menu and select “Upload to I/O Board”. This will upload the “Blink” code to the unit. After a few moments, you should see a LED blinking on the Arduino (Yeah!).
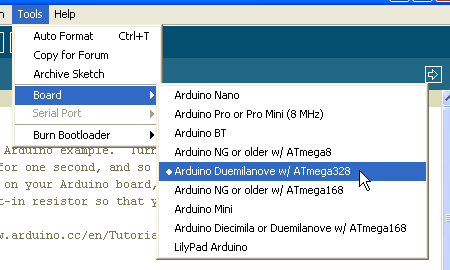
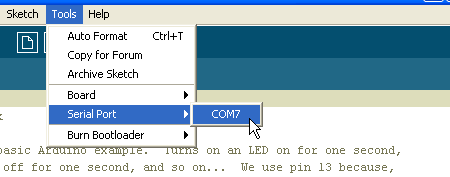
If this does not work for you, make sure you have selected the right board and port from the “Tools” menu.
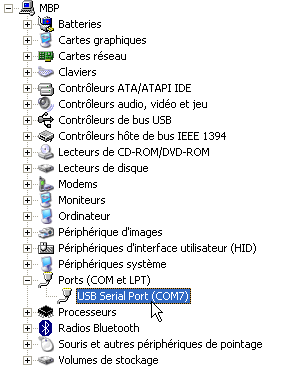
If it still does not work, you should confirm that your board is indeed detected by your system. In Windows XP, you can do so by going to the “Device Manager” and checking that you do have a COM port labeled “USB Serial Port (COM?)”:
On Mac OS X, you will most likely see two types of devices in the Serial port menu. There will be a terminal device (tty) and a call unix device (cu). To upload your sketch you can use either. However, in the SerialProxy configuration (see later) you need to use the cu device. For example, on my Mac I get both /dev/cu.usbserial-A60049RW and /dev/tty.usbserial-A60049RW for my Arduino Diecimila.
Once your setup is known to work, you can try playing with other sketches or even write your own. Check out the Arduino language reference if you wish to do so. However, in our case, we will only be using one sketch: Firmata.
3. The Firmata Sketch
Most of you now want to know how to make this thing talk to Flash. The key is the Firmata sketch (which is bundled with the Arduino IDE since version 0012). As stated on the Firmata website: Firmata is a generic protocol for communicating with microcontrollers from software on a host computer.
So, just as we did with the Blink sketch, load the Firmata sketch in the Arduino IDE and upload it to the board:
Basically, once Firmata is on the board, we will be able to configure and program it directly from Flash using a host code library. If you want to confirm it has been properly loaded on the board, open Arduino’s Serial Monitor. Upon opening, it should print the following to screen “StandardFirmata“.
4. The as3glue ActionScript Library
We now have Firmata installed on the board but we need a matching software library that understands the Firmata protocol. For ActionScript 3, this library is called as3glue. You can download as3glue from Google Code where the project is hosted.
5. The SerialProxy Software Bridge
We’re almost there… But as it is now, there is no way for Flash to talk directly to the USB/serial port. In order to bridge this gap, we need to install the SerialProxy application. What it does is forward serial input and output to and from a network socket connection that Flash can use.
Last time I checked, serproxy.exe 0.1.4 was bundled with as3glue (in the applications folder). This is the one you want to use. Do not use serproxy.exe 0.1.3 or older unless you are looking for trouble. If in doubt, you can download SerialProxy 0.1.4 from my site. Before running it, you need to modify the serproxy.cfg file to match your system. Most likely, the only change you will have to make is assign the right COM port and matching TCP/IP port. For example, in my case, my Arduino is on COM port 7 and serproxy is listening for connections on TCP/IP port 5331 :
comm_ports=1,2,3,4,5,6,7,8,9
net_port7=5331

comm_baud=57600
comm_databits=8
comm_stopbits=1
comm_parity=none
newlines_to_nils=false
timeout=300
Make sure to end the net_port parameter with the matching COM port number. As you may have guessed, this means that you can have SerialProxy talk to multiple Arduinos all at the same time and, if you so desire, accross a network.
Depending on your Firmata version, the baud rate could be 115200 or 57600. You can confirm that by looking at the standard_firmata.pde code in the Arduino IDE. Simply look for a setup() routine near the end of the code. Inside it, you should find the following line which will tell you the speed to use : Firmata.begin(57600);
If your Arduino gets assigned a COM port higher than 9 (I had this problem in one of my classes), serproxy.exe version 0.1.3 will not be able to access it. As stated above, always use SerialProxy 0.1.4.
You can then launch the serproxy.exe application. If everything went well, you should see a command prompt window with something like :
Serproxy - (C)1999 Stefano Busti, (2005) David A. Mellis - Waiting for clients
If you use TinkerProxy the output is different but you get the idea. This serproxy.exe process needs to be running all the time. At least, as long as you want Flash to communicate with your Arduino.
6. Putting it all together
Let’s now check if Flash can indeed talk to the Arduino. In order to do this, you will have to put the as3glue ActionScript library in your classpath. The easiest way to do this is to grab the net folder inside the as3glue/as3/ folder that contains the library and put it right beside the .fla file in which you plan to use it. Then from the as3glue/examples/arduino/blink folder, open the blink.fla file in Flash. Look at the code in the first frame and make sure the port number (typically 5331) matches the one in the serproxy.cfg file then compile the Flash file. You should see the following in the Flash file : Waiting for Firmata firmware version (reset your board)... Just reset your board by pressing the reset button and you should see one of the LEDs start to flash. Congratulations you have made it!
Obvisouly, this is only the beginning. When you are ready to do more, start by looking at the as3glue QuickStart Reference page. When you’ve done that, you can find the full as3glue API documentation (link down) on Bret Forsyth’s website.
Troubleshooting
If you do not see the blinking LED, the first thing to check is if serproxy.exe was able to open the configured COM port. To do so, right after compiling the Flash movie, switch to the serproxy.exe window. If you see "Failed to open comm port. Connection refused." double-check your serproxy.cfg settings because they are probably pointing to a wrong COM port. What you should be seeing after compiling the .fla, if everything worked right, is: "Server thread launched".
A very good troubleshooting tool called as3glue Standalone Monitor has been released by Kasper Kamperman and can be dowloaded on his site (I believe it is not part of the as3glue download package). This tool allows you to monitor Arduino’s inputs and outputs in realtime. If you cannot get your setup to work, try with his .fla file to identify if the problem is with your environment or with your ActionScript code. You will need to press your board’s reset button after compiling the .fla.
Here is a list of additional common pitfalls you should watch out for while trying to interface Flash and Arduino :
- When you transfer the
StandardFirmatasketch, make sure you have the right board selected in Arduino’s Tools->Board menu. For instance, I had a student who mistakenly identified his board as an Arduino Pro w/ ATmega328 while in reality he had a Duemilanove w/ ATmega328. The transfer completed just fine with Arduino giving no hints that something was wrong. The result was that some functions were working fine (like writing to a digital pin) while others did not work a all (like reading from a digital pin or printing to serial). - Make sure you have the right character encoding for your
serproxy.cfgfile. Be safe and use a programmers editor like Notepad++ (and not Notepad) to edit this file or you may end up withserproxy.exestarting and accepting connections but not transmitting to Flash properly. - I also have seen a case where the Flash file seem to have been corrupted. Starting a new one from scratch fixed the problem (I have only seen this once and I’m not 100% convinced that this actually was the problem and not a mere coincidence but I guess it’s worth a try).
- There are security policies that apply if you try to run a swf file directly (as oppposed to compiling it in the Flash IDE). In order for a standalone swf file to talk to SerialProxy you must authorize it by going to Flash Player’s settings manager. You can authorize a single file, a folder or a whole drive. Check out my other article titled Opening a local socket from an SWF file for further information on this topic.
- Of course there are always the four Rs of desperation : Reset, Restart, Reboot and Reinstall… I truly hope you will not end up there!
Hope this helps !
Hi, Your tutorial is excellent! I’m having some trouble though. WIth this particular instruction: “open the blink.fla file”
I don’t understand how to open the source code of an .fla file? I’m using the FlashDevelop application and AS3.
The sample
blink.flafile is a Flash file. You will not be able to open it in FlashDevelop which – correct me if I’m wrong – can only open class files (.as). Either you get your hands on the Adobe Flash application or you look at as3glue sample code at this address : http://code.google.com/p/as3glue/wiki/Reference and integrate the sample code into your own test project.This is honestly the best step by step tutorial on the web…..been trying for month to but this together and its going really well with your tutorial. Ive gotten to step 5 and my serproxy.exe is reading, Serproxy – (C)1999 Stefano Busti, (2005) David A. Mellis – Waiting for clients, although when I get to step 6 “then compile the Flash file. You should see the following : Waiting for Firmata firmware version (reset your board)… Just reset your board by pressing the reset button and you should see one of the LEDs start to flash.” ?? When I do this nothing happens the serproxy.exe…..?? Its just keeps on saying “blink.fla: blink on-board LED connected to Arduino pin 13” on my flash movie….Do you know what Im doing wrong? or can give advice?
Thanks a million…
Do you have any output in the SerProxy window after compiling the
.flafile ? If there is nothing more than before, Flash is not properly connecting to SerProxy. In that case, double check the port configuration in both SerProxy and the Flash file. Let me know if this helps…Does anyone know of any reason that SerialProxy couldn’t allow Flash to interface to any serial device? I’m looking to interface to a Watts Up power meter which is also a USB serial device. I have found no reference to using serprox outside of Arduino interfacing, but can’t see any reason why it isn’t possible.
I have never tried it but it should work just the same as long as it is serial-over-USB. I’m curious to know if you manage to make it work. Let us know your findings.
Hello Jean-Philippe!
This is the first tutorial after a long search that I fully comprehended, excellent commenting! Thank you very much.
Unfortunately I am still experiencing a small problem: I followed your instructions in every detail. When I open the blink.fla with Flash, I can compile it nicely. So when I hit debug (Ctrl+Shift+Enter) a window pops up reading “blink.fla: blink on-board LED connected to Arduino pin 13″ and in line 2: Waiting for Firmata firmware version (reset your board)…”, but thats where it stops – even after resetting the arduino several times, waiting for 1 or 2 minutes in between.
The serproxy.exe says: “Serproxy blabla – Waiting for clients”, “Server thread launched”, “server(4) – thread started” and than after some while (I assume after 8.6 seconds as specified as time out period in my serproxy.cfg) it displays: server(4) – timed out”, “server (4) exiting”.
I am on a Win XP PC, using Flash CS3 with AS3, downloaded the latest as3glue and used the serproxy and firmata version that comes bundled with it.
My Arduino is a duemilanove, hanging on COM4.
When I hit debug in flash without previously starting serproxy.exe, I get an error saying Error#2031: Socketerror. So I guessed the communication between Flash and Serproxy is good, but not the one between the serpoxy and Arduino.
I checked that both baude rates are set to 115200, in the Firmata as well as in the serproxy.cfg. So what I tried next is to start serproxy and in windows/run (windows-key+r) I typed in: telnet localhost 5331. The serproxy window again displays “Serproxy blabla – Waiting for clients”, “Server thread launched”, “server(4) – thread started” and when I now press reset on my arduino, in the telnet window two symbols (an “a” with an “°” on its top and the symbol spade from a cards game) appear. I looked the symbols up in an ascii table and they correspond to dec 134 (hex 86) and dec 6 (hex 6) – at least thats what I found.
So, at least the arduino sends something – but it doesn’t get through to Flash or it has not the right format.
Do you have any ideas, what my problem could be?
I would totally appreciate your help since you seem to have quite some experience on this topic!
Thank you very much, greets
Sebastian
ps: sorry for the long comment… feel free to delete it and send me an email instead!
Edit!!! It works now.
In case someone experiences the same problem, here is what helped me:
In the StandardFirmata.pde, in the end of setup() the function Firmata.begin() is called. So I looked in the Firmata.h file and found, that the begin() function is overloaded: there is one called begin() and one begin(long), which means if you call Firmata.begin() without an argument, then the Firmata::begin(void) inside the Firmata.cpp is called, which has starts the Serial communication with a default speed of 115200.
However, if in the StandardFirmata.pde you call Firmata.begin(115200), the second version Firmata::begin(long) is called, which accepts a long variable for the Serial communication speed.
When I replaced the code Firmata.begin() in the .pde with the line Firmata.begin(115200) everything works perfectly now :o)
Actually it should be the same, since the standard baude rate in Firmata.begin() IS set to 115200, but for some reason this didn’t work for me.
Hope I could help some of you out there,
cheers Sebastian
(its blinkiiiing, jeah!!! hahahaha)
Thanks a million Sebastian, that did the trick for me too!
Well, almost…
Now the receive LED is blinking, but it’s not activating the LED yet on pin 13
(all other sketches, e.g. “Blink” work direct from Arduino software)
Finally got it running, I’m on a seeeduino Mega, don’t know whether that’s a contributing factor.
The StandardFirmata dosn’t work, but if I use the SimpleDigitalFirmata sketch and change the baud rate to 115300 I can communicate with Flash.
I’ll go through Standard and SimpleDigital and find the difference, but for now I’m just happy for my blinking LED 🙂
Sebastian,
I have been using an older version of the standard Firmata sketch with which everything was working fine. When I updated to the latest version I started having the same problem as you described. The simplest fix, as far as I’m concerned, is to simply lower the baud rate to 57600 in the
serproxy.cfgfile. The Firmata people have been oscillating between 115200 and 57600 for some time…Anyway, I’m glad it’s working for you.
hi, thanx, it works for me so far. if i “test movie” in the flash aplication, the connection works and the led is blinking.
but when i run the swf file alone it just keep saying “Waiting for Firmata firmware version (reset your board)…” ?
i checked my firewalls; <- not the problem. thanx for any suuggestions
This might sound obvious but did you try to "reset your board" by pressing the board’s reset button ? This would be my first guess. Also check above, I have added a troubleshooting section which may help you.
yes i reset the board. it works if i test it in flash. however, if i try the swf with the standalone flash player nothing happens after reseting.
That’s normal. There are security policies that apply to a standalone swf that do not apply to a movie compiled in the Flash IDE. There are two solutions to this problem :
After that you’ll be all set. Cheers!
I AM SO CONFUSED
i followed all the steps and get no errors.
i get perfect analog input readings.
BUT
i can´t seem to read nor write to digital pins.
could it be because i am using arduinoMega board? is there a work around?
Kasper Kamperman as3glue Standalone Monitor would help but the link is down,.
anyone know if that is permanent?
Awesome article, spot on.
I also wrote a blog post on this same subject, but from the mac OSX side if anyone was looking here for
those instructions(orphaned link).I added a link to your tutorial at the top of this post. Thanks for sending it in. I’m sure it’ll be helpful to many.
Hi there!
I have the same problem. I am using arduino mega also. There is no error showed, nevertheless I´m not able to see the led blinking! Did you solve the problem?
Greets?
Kadri
Read the comment above about editing the line firmata.begin(), i use a mega and that did the trick for me. mine was initially set to firmata.begin(57600) so changed it to the higher number and it worked fine. although i have to unplug and replug it if i want to run the program again. hope this helps
Hello JPCOTE, What a great tutorial – thanks for all your help so far!
I have got everything working with the Actionscript from the ‘as3glue_program-example.fla’ file pasted into the first frame on my Flash timeline and am now beginning to attempt to write my own Flash programme…
Essentially, all I want it to be able to do is to play my animation in the main timeline and then to send ‘HIGH’ signals to different Arduino outputs when it gets to different frames on the timeline. I am trying to do this by pasting in the ‘a.writeDigitalPin(6,1);’ command into the Actionscript for that specific frame, But this does not work.
Do you have any suggestions of how I can get this command to work across different frames in the main timeline? I tried to paste in all the Actionscript code from the first frame (which sets up the pins etc) into this other frame, but this did not work either.
Any help would be much appreciated – I am a novice (both with Flash and Arduino, Sorry!)
MAny thanks, Ellie
Using code on multiple frames has always been a no-no for me. It’s a huge source of problems. I always prefer to keep my code on the first frame or, even better, in a separate document class file. All that to say, it’s kind of hard to troubleshoot an issue with no code to look at…
This tutorial was recommended to me by my lecturer. It really does what it says on the tin! Thanks a million, it is very helpful, communication worked first time round 🙂
May I ask which course it was for ? I’m a lecturer myselft and I’m always eager to learn new tricks and approaches to pass on to my students.
hi,
is it necessary to start serproxy.exe manually(windows)?
if yes then is there so way to automatically start on running flash file?
because i need to make an Adobe AIR package…
thanks for help 🙂
The
serproxy.exeapplication can be started any way you choose but, of course, it needs to be running… As of today, I do not believe Air 2.0 can launch an external application directly. My understanding is that it can only launch a file in its default application.However, there are third party solutions that could help you such as CommandProxy (link down) or the
Shu Player(does not seem to exist anymore).hey man! good tutorial!
works fine but i can’t acess my aplication from the network (on my mac in the wi-fi network)
i have to do something else?
i trid put the swf file in a php page with a fopen function and didn’t work!
any sollution??
pleeease help me! 🙁
Thanks!!
I’m not sure I understand your problem. You will have to be more specific in order for me to help you.
I seem to have the same problem as this commenter. I am successful with running this in a standalone flash player after changing the security settings. But when I try and open up the swf file in a browser over the network the swf does not play even after trying to change the same security settings. Any help?
I think you are trying to do something that will never work due to browser sandbox restrictions. As far as I know, no browser will let one of its plugins access a server running locally. This is just not possible for security reasons. I guess that if you wanted to do that you would have to put serproxy.exe on a public server and access it there.
Hi Jean-Philippe
I find it amazing your tutorials.very explicit!You know.I am a technician in electronics and I am doing my first baby-steps towards microcontrollers.For that reason I was recommanded Arduino Duelminove which I bought it but I did not have the chance to benifit from it.The reason is when I download the software(I am using windows sweet 6 and before I was using vista) from arduino page ,I click to unzip the files but nothing happened.Would you please guide me ,I am desperately in need of your help to work on projects.
Thank you very much
Adam
hi
i have been trying to get this to work for the last 2 days and its really annoying me lol i have followed all the steps on this page but it just doesn’t work and i feel as if i have tried everything when i run the flash program it says
– Error #2031: Socket Error. URL: 127.0.0.1
– Did you start the Serproxy program ?
however the serproxy works perfectly fine so does the arduino board i can upload a sketch without any issues
i feel as if i have tried everything, i have pinged 127.0.0.1 and it worked i have gotten into the windows host file and 127.0.0.1 has been set to my localhost. i have done the flash player trust thing, modified the security settings and also Compile as a projector. i have tried using telnet in the command prompt and it just wont communicate through port 23 and i know i tried a few more things but still not connecting
so if u can help me and tell me how to solve it step by step i will be rally grateful
thank you so much
The way to check if
serproxy.exeis set up correctly is to start it in one window and to try to manually connect to it in another window. You can do that by using thetelnetcommand. Basically, this simulates what Flash does when it tries to connect toserproxy.exe. When you issue thetelnetcommand in the second window, you must use the ip and port that serproxy is listening on. For example:serproxy 127.0.0.1 5331If you get a prompt, serproxy works. If not, there is something wrong either with serproxy or with your network setup.
P.S. Telnet is now disabled in newer Windows versions. Check out this article for details on how to activate it:
Is there a way to control devices on arduino from flash directly without programming the board first? Say I want to have a slider control on flash that as I move it from side to side with the mouse, it moves an actuator back and fourth. Could I do that?
Of course you could do that. You do not need to “program” the Arduino. You just need to install the firmata sketch on it as instructed in this tutorial
An even simpler way (which did not exist when I wrote this tutorial) is to use the as3-arduino-connector. It’s an ANE (ActionScript Native Extension) that will allow you to talk directly to the Arduino from Flash.
To furnish your home with all beautiful items, buy home decor online at a great deal on festivals and other seasons.
The colors are usually applied over a base of a neutral sand paint.
In this way you can light an entire room with only one or two fixtures
(saving you energy through the number of light fixtures as well as the amount
of electricity used to light them).
Very neat post.Really looking forward to read more. Awesome.