My students often ask me how to use .swc files within their physical computing projects. They know how to use external libraries in the form of class packages but are a bit stomped when the library is delivered in the form of a .swc file. Here is the linking procedure for various ActionScript editors.
A .swc (commonly pronounced “swic”) file is a compiled package of Flash symbols (such as DisplayObjects, fonts, sounds, etc.) and ActionScript classes. It is often used to distribute libraries as a single file or to hand over visual assets created in Flash Pro to programmers using another IDE (Flash Builder, FlashDevelop, FDT, etc.).
Once a .swc file has been properly linked, you can use its classes and assets as you normally would. For instance, if the .swc contains a class called Bar in a package called foo, you would simply import it in your code as usual :
import foo.Bar; |
Having said that… how do you link it ?
Adobe Flash Builder
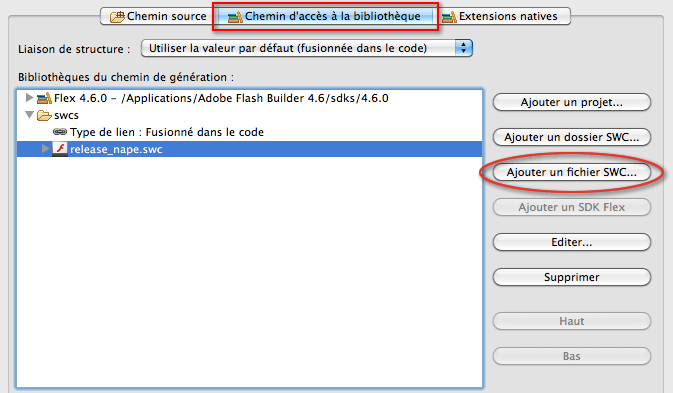
In Flash Builder (I’m using version 4.6 for this example), you have to right-click on your project and select “Properties”. In the window that appears, you then need to select “ActionScript Build Path” on the left end side, then select the “Library Path” tab and then click on “Add SWC…”.
You can also add a folder containing all you .swc files (useful to link a bunch of .swc asset files) by clicking on “Add SWC Folder…”.
Adobe Flash Pro
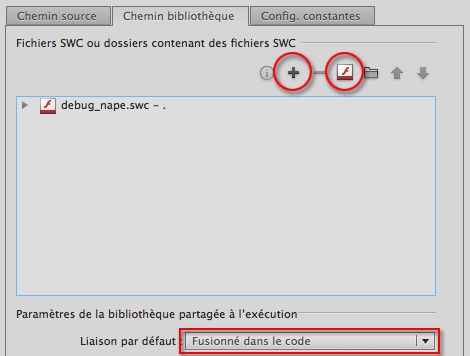
In Flash Pro (I am using Flash CS5.5 for this example), linking is done by opening the “Publication Settings” window (from the “File” menu) and clicking on the tool icon to the right of the script item :
You can also get there by selecting “ActionScript Settings…” from the “File” menu (this must be new as it is only now that I notice it!).
Then, in the window that appears, you need to select the “Library Path” tab and click on the “+” sign (for a relative link) or the little Flash icon (for an absolute link) to add a link to your .swc file.
Make sure that the “Default Linkage” box is set to “Merged into code” as this is most likely what you want.
Please note that .swc file linking has only been available since Flash Pro CS4.
FlashDevelop
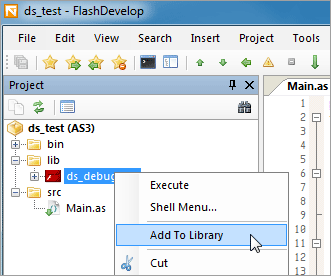
In FlashDevelop, you should put your .swc file inside the project, for example under a /lib directory. Then, in the project panel, you simply right-click the .swc file and select “Add to library” :
The linking mode should be fine but if you want to change it, you can always go to back to the project panel then right-click the .swc file and then choose “Options”.
If the .swc is located outside the project, you will have to add it by going to : Project Properties -> Compiler Options -> SWC Libraries. You can then input an absolute or relative path.
PowerFlasher FDT
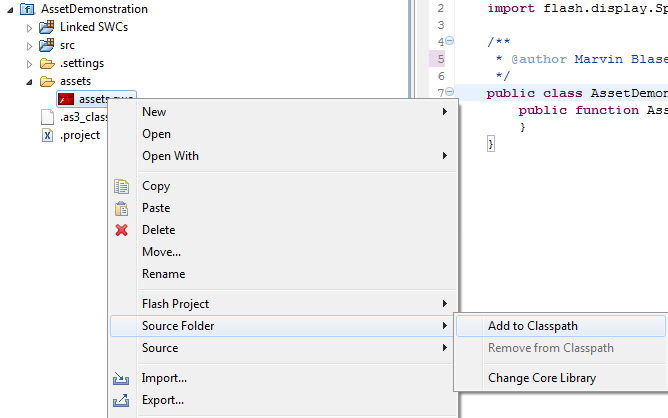
It’s pretty much the same thing here : put the .swc file within your project in a /lib or /assets folder. Then, right-click the file, go to the “Source Folder” submenu and then select “Add to classpath”:
There you have it. Hope this has been useful!
Note : the screenshot for FDT is from the beautify code website (link no longer works) and the screenshot for FlashDevelop is from the polygonal wiki.


Thanks for the reference! Good information, and you actually took the time to explain how to do it in multiple different editors.
Thanks very much for this. It can be tricky to figure out some of these little setup things when moving to a new platform.
Glad you found it useful. Cheers!