
It might not be obvious at first but multiple Starling instances can be run concurrently. They can even be attached to the Stage reference of different NativeWindow objects.
This is useful if you are developing an AIR application with multiple windows or if, like me, you need to independently control what’s showing up in two (or more) monitor screens for an interactive installation. Read on to know how to set it up.
Actually, the whole thing is relatively easy except for two pitfalls, the first pitfall is that you must enable ‘direct’ render mode on the secondary window also. Here’s the relevant extract from the full code :
32 33 34 | var nwio:NativeWindowInitOptions = new NativeWindowInitOptions(); nwio.renderMode = NativeWindowRenderMode.DIRECT;_secondWindow = new NativeWindow(nwio); |
This is the equivalent, for the secondary window, of using <renderMode>direct</renderMode> in the application’s XML descriptor file (which applies to the primary window only).
The second pitfall, which threw me off for a while (thanks to Jeff Adams for his help on this), is that we must wait a little before instantiating the second Starling instance, or else we get an error. This is what line 66 below does.
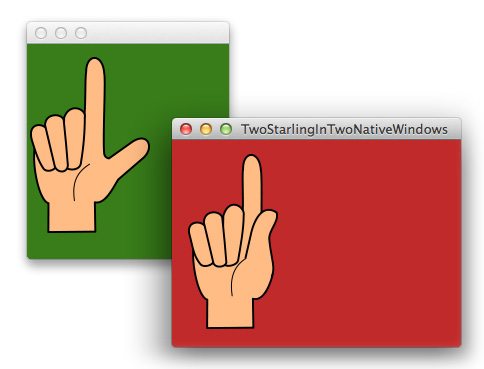
1 2 3 4 5 6 7 8 9 10 11 12 13 14 15 16 17 18 19 20 21 22 23 24 25 26 27 28 29 30 31 32 33 34 35 36 37 38 39 40 41 42 43 44 45 46 47 48 49 50 51 52 53 54 55 56 57 58 59 60 61 62 63 64 65 66 67 68 69 70 71 72 73 74 75 76 77 78 79 80 81 82 83 84 85 86 87 88 89 90 91 92 93 94 95 | package { import flash.display.Bitmap; import flash.display.NativeWindow; import flash.display.NativeWindowInitOptions; import flash.display.NativeWindowRenderMode; import flash.display.Sprite; import flash.geom.Rectangle; import starling.core.Starling; import starling.display.Image; import starling.events.Event; import starling.textures.Texture; public class TwoStarlingInTwoNativeWindows extends Sprite { // Embed demonstration icons [Embed(source="images/one.png")] public static const OneBitmap:Class; [Embed(source="images/two.png")] public static const TwoBitmap:Class; // Secondary window variables private var _secondWindow:NativeWindow; private var _secondStarling:Starling; public function TwoStarlingInTwoNativeWindows() { // Starling requires the windows to be in 'direct' render mode. // This was done for the primary window through the use of the // following instruction in the app's xml configuration file: // direct. The following lines do the // equivalent for the additional window. var nwio:NativeWindowInitOptions = new NativeWindowInitOptions(); nwio.renderMode = NativeWindowRenderMode.DIRECT; _secondWindow = new NativeWindow(nwio); // Set window size and activate it (a window only shows up when // activated). _secondWindow.bounds = new Rectangle(200, 200, 500, 250); _secondWindow.activate(); // Primary stage is red and secondary stage is green stage.color = 0xC02A2A; _secondWindow.stage.color = 0x387D19; // Add a starling instance to the primary stage, start it and // listen for creation of the root (usual stuff here). var _primaryStarling:Starling = new Starling(StarlingCanvas, stage); _primaryStarling.start(); _primaryStarling.addEventListener( Event.ROOT_CREATED, _onPrimaryStarlingReady ); } public function _onPrimaryStarlingReady(e:Event):void { // Add the 'one' icon to the primary stage var sl:Starling = (e.currentTarget as Starling); sl.stage.addChild(getImage(OneBitmap)); // This next line is key. If you try to setup the secondary // Starling instance right away, you might crash or generate a // Starling error [see for yourself by calling startSecondary() // right away]. That's why it is being delayed a bit. Starling.current.juggler.delayCall(startSecondary, 1.5);// startSecondary(); } public function startSecondary(e:Event = null):void { // Add a second Starling instance on the secondary stage, start // it and wait for root creation (same as before). _secondStarling = new Starling(StarlingCanvas, _secondWindow.stage); _secondStarling.start(); _secondStarling.addEventListener(Event.ROOT_CREATED, drawOnSecond); } public function drawOnSecond(e:Event):void { // Add the 'two' icon to the secondary stage (e.currentTarget as Starling).stage.addChild(getImage(TwoBitmap)); } public function getImage(imageClass:Class):Image { var bitmap:Bitmap = new imageClass(); return new Image(Texture.fromBitmap(bitmap)); } } } |
For your convenience, I am also providing this example’s full source code for download. It includes the above code and the Starling class.
Note to FeathersUI users: Feathers makes extensive use of the Starling.current property. This results in a lot of confusion when using more than one Starling instance. Hence, Feathers 1.0.1 will not work reliably in such a scenario.
Hope this helps!